NetSuite
NetSuite is a cloud-based business management software suite offered as a service that performs enterprise resource planning (ERP) and customer relationship management (CRM) functions.
Features
| Feature name | Supported | |
|---|---|---|
| Column Hashing | True | Field level |
| Blocking | True | Field level |
| Incremental | True | |
| Custom data | False | |
| History | False | |
| ReSync | True | Table level |
| Templates | False |
Setup Guide
As an Administrator of the NetSuite Account you want to integrate with Weld, you need to complete the following tasks within your Netsuite account:
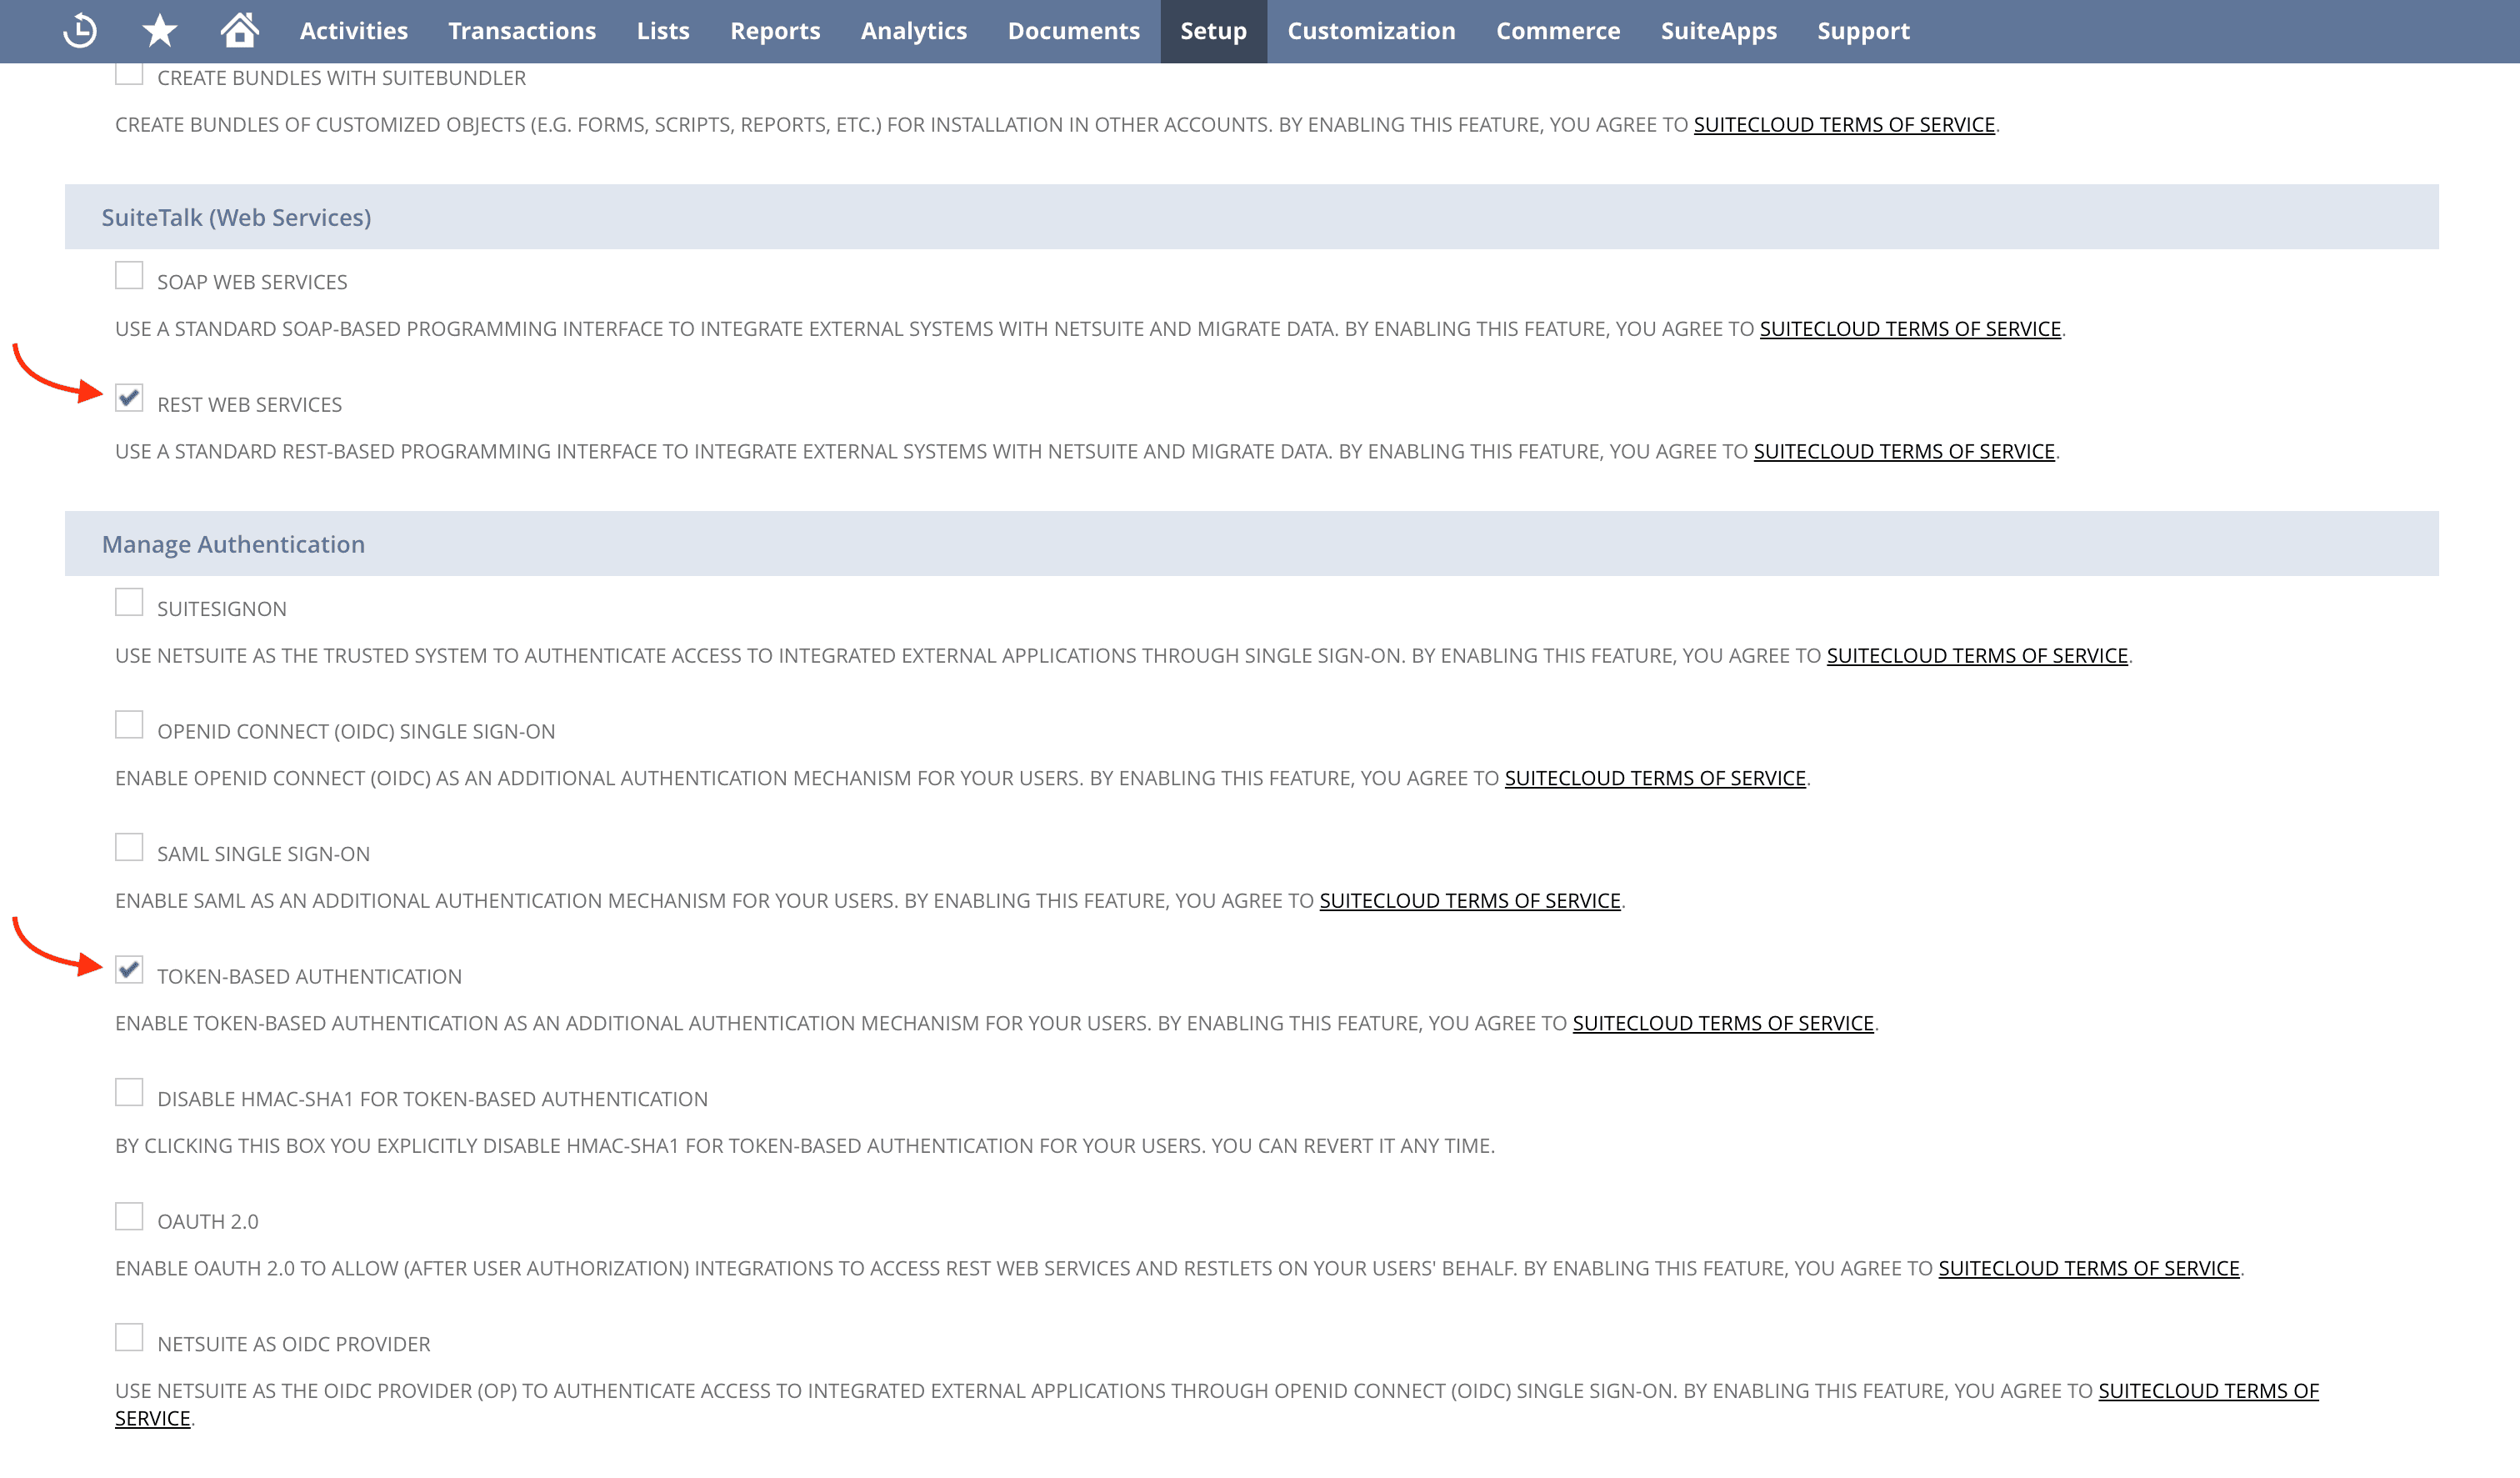
Step 1 - Enable the Token-based Authentication Feature
- Go to Setup > Company > Enable Features
- Click on the SuiteCloud tab.
- In the SuiteTalk (Web Services) check REST Web Services
- In the Manage Authentication section, check the Token-based Authentication box. Click I Agree on the SuiteCloud Terms of Service page.
- Click Save.
Step 2 - Set Up a Role and Assign it to Users
We recommend to create and use a dedicated user for the Weld Integration for security reasons. This user needs to have the required permissions to access through an assigned role. You need to either create a new role with the required permissions or you can assign these permissions to an existing role.
The required permissions:
- Transactions:
- Find Transaction
- All the records needed
- Lists:
- Perform search
- All the records needed
- Setup:
- REST WEB Services
- Log in using Access Tokens or Oauth 2.0
- Reports:
- SuiteAnalytics WorkBook
To assign the permissions to a role:
- Setup > Users/Roles > User Management > Manage Roles
- Select a role to customize or create a new role.
- On the Permission tab, Transactions sub-tab, choose the required permissions from the list and click Add.
- Find Transaction
- All the records needed
- On the Permission tab, Lists sub-tab, choose the required permissions from the list and click Add.
- Perform search
- All the records needed
- On the Permission tab, Setup sub-tab, choose the required permissions from the list and click Add.
- Log in using Access Tokens
- REST Web Services
- On the Permission tab, Reports sub-tab, choose the required permissions from the list and click Add.
- SuiteAnalytics WorkBook
- Click Save
Make sure the role is assigned to the User that will be used for the Weld Integration.
- Go to the entity record for the user:
- If the user is an employee, go to Lists > Employees > Employees.
- If the user is not an employee, go to List > Relationships, and then click Customers, Partners, or Vendors.
- Click Edit next to the name of the user you want to assign the role.
- Click the Access tab.
- In the Role field, select the role for this user.
- Click Add.
- Click Save.
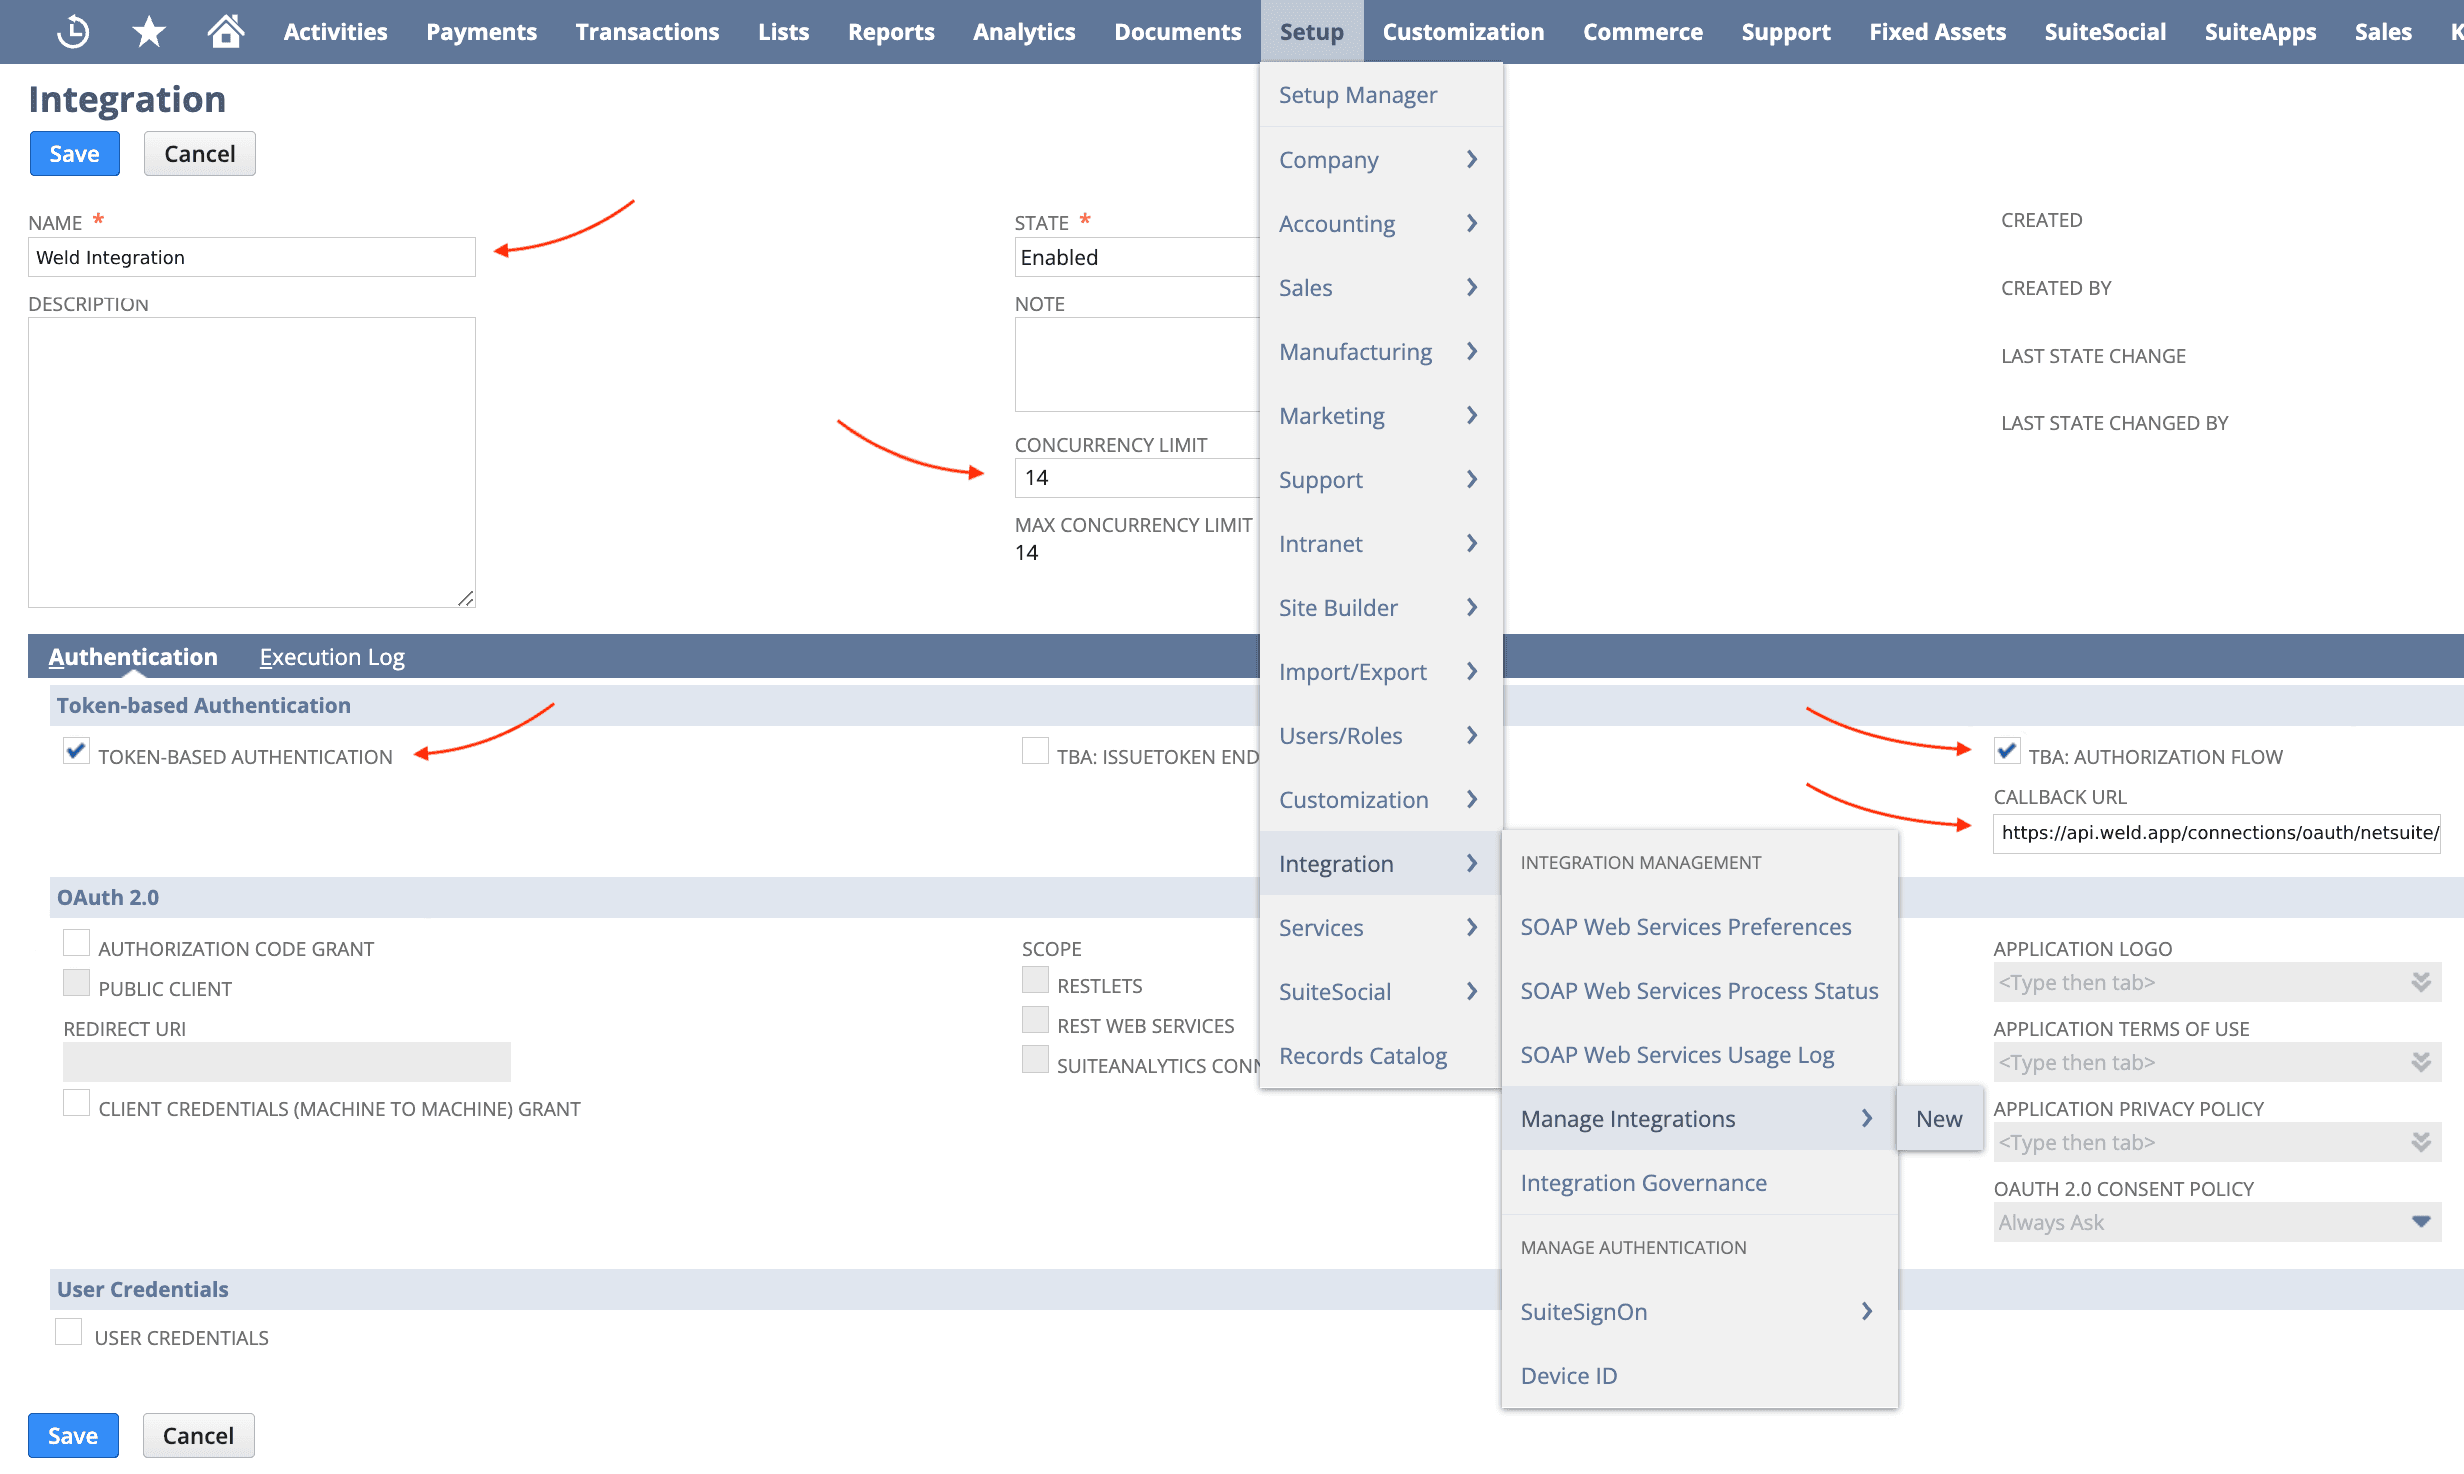
Step 3 - Create an Integration Record for Weld integration
- Go to Setup > Integration > Manage Integrations > New
- Enter the Name of the integration, for example,
Weld Integration - The application State is Enabled by default, keep it Enabled.
- On the Authentication tab, do the followings:
- Enable Token-based Authentication
- Enable TBA authorization flow
- Fill the Callback URL field with
https://api.weld.app/connections/oauth/netsuite/redirect
- Set the Concurrency Limit to the highest value possible with your NetSuite license. This value limits the concurrently running NetSuite syncs at a time, greatly affecting the speed of your syncs. The higher this number is the better.
- Click Save.
- Copy the Consumer Key and Consumer Secret values. You will need these values to configure the Weld connector. These values are only visible once, so make sure to save them in a secure place.
Step 4 - Begin Configuration on Weld
- In your Weld workspace, in the connector setup form, enter the destination schema name of your choice.
- Fill in the Consumer Key and Consumer Secret values you copied from the Integration Record.
- Click Authorize to allow Weld to access your NetSuite account using OAuth.
Step 5 - Approve and finalize
- Approve Weld to access your NetSuite account.
- When authorization is complete, you will be redirected back to the Weld connections overview. The configuration is complete.
If you experience any issues with the Authorization in Weld, check for tips in the Troubleshooting section below.
Step 6 - Connection Settings
Set the Concurrency Limit to the same value you've set to the Weld Integration in NetSuite in Step 3.
Step 7 - Data To Sync
Select the data you want to sync from your NetSuite account.
The tables might take a while to load (several minutes), depending on the number of tables in your NetSuite account.
Step 8 - Configure Sync
- Select how often you would like the data to sync.
- Provide a unique destination table name.
Weld will take over from here and commence syncing data from your NetSuite account.
Troubleshooting
Issues with Authorization
If you experience any issues with the Authorization in Weld, check the Login Audit Trail in NetSuite for insights.
- Go to Setup > Users/Roles > User Management > View Login Audit Trail
- Check the Use Advanced Search box.
- Click the Results subtab.
- Add the following fields: Detail, Token-based Access Token Name, and Token-based Application Name.
- Click Submit.
The Detail column displays the error messages for any token-based authentication logins with a status of Failure.
Error: This user has exceeded the number of active access tokens for this role
This error usually happens when the same NetSuite user is used repeatedly while testing or reconnecting integrations. NetSuite limits active Token-based Authentication (TBA) access tokens to 25 per user.
To resolve this, revoke one or more old or unused access tokens:
- In NetSuite, go to Setup > Users/Roles > Access Tokens.
- Find an old or unused token for the affected user and role.
- Click Edit for that token and mark it as revoked.
- Save your changes, then retry authorization in Weld.

You can find some details about the error message in the NetSuite documentation here. If the error is not straightforward, you can contact our Support for further assistance.
Sync is running slow
If your ELT sync is running slow, that can because we only sync the number of tables at a time equal to the Concurrency Limit allocated to the Weld Integration in Netsuite. If you have a lot of tables especially at their initial sync, the sync might take a while. If you want to increase the number of parallel syncing tables, you might want to check the Concurrency Limit in the Weld Integration in NetSuite. The higher this number is the better.
- In your NetSuite Platform, go to Setup > Integration > Manage Integrations and select the Weld Integration.
- Set the Concurrency Limit to the highest value possible with your NetSuite license and save it.
- Then in Weld, go to Data Sources, select the NetSuite connection, click on Configure and update the Concurrency Limit to the same value you've set in NetSuite.