How to Set Up a Custom Connector in Weld
Bring data from any API into your warehouse - even if Weld doesn’t support it (yet)
Weld supports over 200 data connectors out of the box. But sometimes you need to pull data from a tool or system that Weld doesn’t integrate with natively. That’s where custom connectors come in.
Custom connectors let you bring data into your warehouse from any public API by hosting a simple HTTP endpoint that Weld can sync from on your terms.
Whether you’re working with niche SaaS tools, internal systems, or one-off use cases, custom connectors give you full control over how your data flows into Weld.
What is a custom connector in Weld?
A custom connector is a self-hosted HTTP integration that Weld communicates with using a standard interface.
You provide a public endpoint, and Weld takes care of everything else: scheduling, schema inference, deduplication, lineage, error handling, and alerting.
Your connector only needs two endpoints:
- /schema: defines the available tables and their structure
- / (root): returns the actual data for a given table
Note: Custom connectors are self-managed. Weld can’t offer support for the connector code itself, but we handle the platform side so you can focus on your logic.
What you need to build one
-
Build your connector
Use any language you like. Just expose two endpoints: /schema and /, following Weld’s format.
-
Host it publicly
Deploy it as a serverless function (e.g. Google Cloud Run, AWS Lambda) or on any public URL.
-
Set it up in Weld
Add your connector URL and secure bearer token in the Weld UI. Weld will use this to authenticate and sync data.
That’s it. Weld handles the rest, including retries, alerting, and syncing to your warehouse.
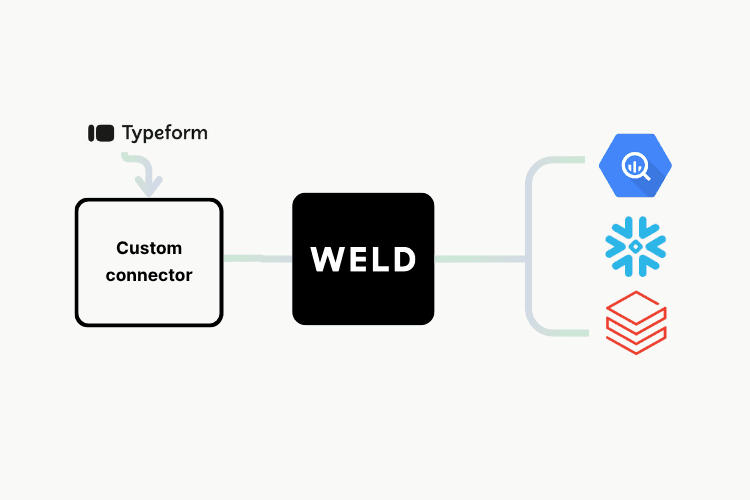
Example: Building a custom connector for the Typeform API
We’ll soon release a full video walkthrough of this connector—stay tuned if you prefer watching over reading.
To make this more concrete, here’s how we built a custom connector for Typeform’s API using Python and Google Cloud Run.
Stack used
- Language: Python
- Hosting: Google Cloud Run
- Framework: functions-framework
1. Set up your development environment
Create a virtual environment and install the required packages:
1pip install requests functions-frameworkStart with a basic Hello world handler and test locally on port 8080 using the functions-framework debug server.
2. Explore the Weld and Typeform APIs
Review the Weld custom connector docs and Typeform API docs. Note:
- Weld requires /schema and root endpoints.
- Typeform uses bearer token authentication and paginated responses.
3. Implement the /schema endpoint
Define the structure of your tables, including the primary key. Weld uses this for schema inference.
1{
2  "schema": {
3    "form": {
4      "primary_key": "id",
5      "fields": [{ "name": "id", "type": "string" }]
6    }
7  }
8}
9
Use the request.path logic in your function to return this JSON when /schema is called.
4. Implement the root / endpoint
Use a POST handler to fetch and return data. Handle:
- Table name from request body
- Pagination via query parameters
- API calls with bearer token
Start with static hasMore and state values; we’ll refine those next.
5. Handle pagination and state
Track page numbers or form IDs using the state object Weld provides. Update the logic to:
- Send the correct page in the API request
- Return updated state and hasMore based on response
Add data cleaning to remove unused fields from the response.
6. Add multiple tables
To fetch form responses:
- Extend the schema with a form_response table
- Track and iterate through form IDs to fetch responses
- Separate state logic for form and form_response
You can also enrich form responses by appending metadata as needed.
7. Secure the endpoint
Validate incoming requests with a bearer token and return 401 Unauthorized if the token doesn’t match your environment variable.
8. Deploy to Google Cloud Run
Use the inline editor to deploy your connector:
- Select Python 3.13
- Add environment variables for API and Weld tokens
- Set up the entrypoint and requirements.txt
- Allow unauthenticated access (your code handles auth)
Test your endpoint using the Cloud Shell tool.
9. Connect in Weld
In the Weld UI:
- Add your endpoint URL
- Provide the bearer token
- Enable deduplication (optional)
- Create and monitor your sync
Once complete, your Typeform data will appear in your warehouse, ready for analysis.
When to use a custom connector
Custom connectors are ideal when:
- You need data from a system Weld doesn’t (yet) support
- You’re pulling from internal APIs or client-specific sources
- You want full control over how data is fetched and structured
Once live, you get all the benefits of a built-in Weld connector—with your own custom logic.
Resources
- Documentation on custom connectors
- Video tutorial on building the Typeform connector (coming soon!)